Sadly, many microstock sites reject images with only a vague explanation of what's wrong, sometimes you will get a clear message that the problem is dust / specks on a sensor, but more often the image is rejected for something less obvious like "Noise / Artefacts / Grain on the image" or "clean up the background / poor isolation"
A close look at 100% will make it relatively obvious if the problem is dust on your sensor, but only if you know what you are looking for. Sensor dust can be more or less visible with different lenses (focal lengths) and apertures. In some cases the dust, dirt or pollen is easily obscured or blurred out, in other images it becomes very apparent.
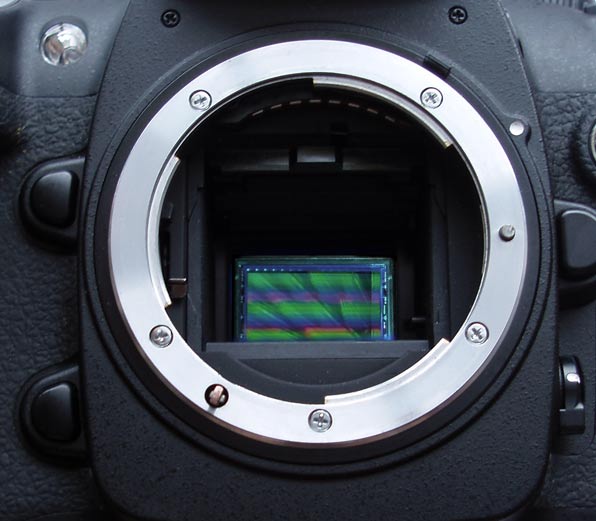
Contamination of sensors is something that all DSLR owners will come across sooner or later. If you never change your lens then it's possible that you will never have a problem for many years, but if like most photographers you have more than one lens then sooner or later you will end up with specks of dirt on the CCD. Strictly speaking it's not actually the sensor (CDD or CMOS chip) it's the cover over the top of the sensor, depending on the manufacturer it might be called a hi-pass filter or anti alias screen.
Checking for Dust on your Sensor
Looking at your sensor with the naked eye (all DSLR'S have a mirror lock up / maintenance mode which allows you to look at the sensor) will likely reveal nothing unless a relatively large piece of debris has stuck on there. Most of the dirt that causes problems on sensors is way too small to see with the naked eye.
You can easily check if you have dirt on your sensor by taking a raw image of a clean white sheet of paper (make the image as out of focus as you can and stopped all the way down to smallest aperture). Open the image in your raw processor software at 100%, if grey or black specks are apparent then you have dirt that needs cleaning. For further analysis you can also increase the contrast of the image in a raw processor by increasing the 'blacks' slider, then after opening in photoshop (or similar) do an auto levels to make the specks of dirt stand out even more. The same is possible with JPEG, but with raw you get more control over increasing the contrast of the image. The method is similar to that you can use quantify the vignetting a lens creates).
I find that the noise is easier to see with my longer lenses (although I can still see dirt with a 20mm lens). Here is a comparison between the same focal length but different extremes of aperture setting:

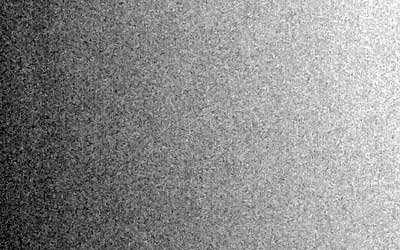
Typical Dust Spots at F45 300mm (approx 450equiv)
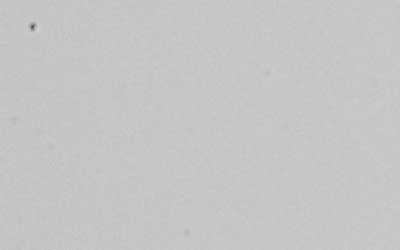
Same spot taken at F5.6 300mm (approx 450equiv) all we see is the exaggerated vignette at this aperture, the sensor dust is virtually invisible.
One thing to remember is that you will find it hard to get every speck of contamination cleaned off. Especially if you increase contrast to make detection easier. There are reasonable lengths you can go to clean a sensor, your aim is to make what dust there is undetectable on typical photo. Of course specks of dust will start to build up after you clean again anyway. I've heard some professional photographers saying then get their sensor cleaned monthly at the same place for a discount. For most amateur photographers I'd expect to manage at least a year without cleaning. Different cameras attract dust at different rates and some have various systems to shake off or stop dust being attracted, all however will eventually need a clean.
This is the F45 image from above before auto levels in photoshop, note that this is almost the worst case as it stands (contrast increased in camera raw and worst case lens scenario). You can see that some of the noise will be almost impossible to spot in a photo taken with this sensor, your aim is to get rid of those 'bad bits' you can see without increasing the contrast.
Decisions
You can go and get someone to clean it for you, the price will be around $50 US, sometimes more (and I personally think that for the relatively simple service taking place camera shops are just milking money out of this by charging what they can, $100 in some cases).
There is a choice here, you have an expensive camera, but one that I personally think is not as delicate as some manufacturers of cleaning products would like have us believe. Of course there are stories of people destroying their camera, and of course different cameras have different sensors which may be affected in different ways by different cleaning processes. If you are not confident about cleaning then pay for the service. The rest of this post is a run-down of what I have learned though cleaning my own sensor.
There are dozens of newfangled sensor cleaning products in the market place. I've not tried all of them, but many seem over priced for what they are.
I've found that blower brushes (used just to blow) are pretty much ineffective when it comes to getting rid of dirt and tiny hairs that have stuck themselves to my sensor. You can get rid of large particles that you can see with the naked eye, but quite often you end up just moving dust around or adding more dust from the local environment.

Wipe with a blower brush
Almost everything you touch in day-to-day life is covered in dust and dirt. If you have done any macro photography you will have seen this already as all the objects you shoot will need a good clean (especially black items). I have a have a Nikon D200 that has a low pass filter over the CDD. If I were to take a new, clean blower brush (check for dust on it before I used it) and wipe it across your camera sensor, in doing so I would completely cover the sensor with hundreds of specks of dust that were attached to the blower brush, even though it looked clean before I used it those hairs on the blower brush were filthy (ever seen those microscope images of your skin flakes?)
How to Clean it Yourself
I've cleaned my sensor many times. I use lint free lens tissues (like 'safetiss'), a plastic swab and some cheap lens cleaning fluid. It works for my D200 but don't take that as my guarantee it won't do damage your camera. All I can say is that if $5 lens solution is good enough for multi coated lenses and filters then I'm fairly sure that there is no need to pay $50 for something that won't damage the filter on your sensor. Do read up on your individual camera, some have special anti-static coatings (tin oxide) on the sensor, and most manufacturers recommend the use of special cleaning fluids or processes.
Ingredients
You will need: (again, this is how I clean my camera, don't hold me responsible if you damage your camera following this process).
1) A can of Air Duster (Compressed Air)
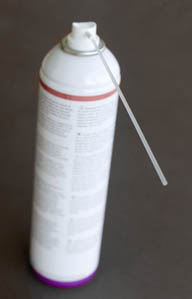
To be used with caution, read the method below, don't tilt the can while spraying. Typically the can will say something like "used for cleaning camera lenses, electronics and art applications". You can buy this from a camera shop or electronics supplier but be careful with the 'gas' cans that you can get for artists air brushes unless they also say suitable for the above. Make sure that you read the label on the can of air duster, some need shaking, some don't, but more importantly place it on a flat surface and hold the camera up to the can or you risk squirting ice-cold liquid propellant into the camera / sensor (I've done that once and it was easy to clean off without damage but perhaps I was just lucky).
2) Fully charged and reliable batteries (don't risk the battery running flat and dropping the shutter while you have a swab in there) some camera manufacturers require a power cable before allowing the camera into 'cleaning mode'.
3) Some lint free lens cleaning wipes (photography store or someone who deals in equipment for cleaning fibre optic terminations) and a 2 swabs on which to wrap these wipes (one for dry application and one for wet). The end profile of the swabs should be as wide as the width of your sensor and a thin as possible. They will be used to sweep from one edge of the sensor to the other, covering the full width in one pass.
4) Lens cleaning fluid or "Dust Aid" or a more expensive specialist CCD/Sensor cleaner if you are worried about using lens cleaner, especially if your camera sensor has a special coating.
5) Instead of 3 and 4 I have also used Green Clean (they are expensive but good) they are packs of disposable wipes, one dry and one wet, sealed in clean room conditions. Once used they must be disposed (unless you plan to recycle them with by covering the pads with fresh of lint free tissue).
NB: Kitchen tissue or cotton buds will not substitute as cleaning swab material, these products will be covered in particles of paper or cotton dust, and make your sensor dirtier not cleaner.
Some complain bitterly on forums about using air in a can to clean their sensor saying it may fire particles into the ccd and damage it. I've had no problems (yet), and from what I understand these 'accidents' come down to one of 2 things, tilting the can while spraying or stupidity, the latter probably being the most common.
Method
1) Read the cameras manual about mirror lock up / maintenance mode and make yourself happy with the process of getting in and out of that mode so that you can access the sensor. You might not damage your sensor, but if the shutter curtain closes while you have a cleaning swab inside the camera then the delicate shutter leaves are likely to be damaged.
2) Find a good work surface, wipe it and everything you are going to use with a damp cloth trying to get rid of any dust, also wash your hands - Most people don't have a 'clean room conditions' at home so try your best to keep everything spotless (including the camera)
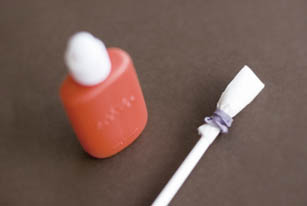
3) Wet clean, either using freshly opened green clean wet swab or a home-made equivalent (a plastic swab covered with a lens tissue held on with an elastic band). I once used a plastic lolly pop stick cut to shape but that was not ideal. There is a balance on how much cleaning solution you drip the swab before you brush the sensor. Go with one drip at first and see, if it's too little then the sensor will be dry before you do your dry sweep, too much and you risk wetting more than just the cameras' low pass filter.
Sweep across the sensor from one end to the other in one gentle stroke. don't sweep back and forth, that will just deposit the collected dust back onto the sensor as you go back.
4) Quickly (so you might need two swabs / mini spatulas one for wet and then one for dry) do a SINGLE sweep across the sensor with a dry swab to collect all the cleaning solution before it dries.
5) There should now be no moisture or 'streaks' on the sensor, if there are then repeat step 3 and 4 with a clean swabs / swabs wrapped in flesh lint free tissue.
6) Optional (but I have found necessary if you want to remove the maximum amount of dust). Now there is no moisture on the sensor or in the camera, clean with the air duster. Making sure that the can has not moved and is placed on a firm surface press the nozzle (with the straw firmly inserted and taped on in case it fires off the nozzle) and then keeping the nozzle pressed move the camera into position so that you are blowing about 10 or 20mm from the sensor and then move the camera away from the end of the straw and release the nozzle. The reason for not pressing the button on the can once the camera is in position is to make sure that no liquid propellant is squirted into the sensor as sometimes happens as you first press or release the button. Liquid propellant can also be ejected if you tilt the can downwards while spraying so leave it upright on a firm surface and spray from there.
7) Take a test picture and evaluate if you need to repeat the process. For a badly contaminated sensor it may take several attempts, but you should see a marked improvement on each pass.
Quick Cleaning's
It might be possible to quickly clean your sensor using just a large blower brush to blow (with the brushes removed), or using the air in a can. The wet cleaning method above is required for contaminants which have stuck onto the sensor (unfortunately this is often the case).
Cautions
- Only use wet cleaning on cameras with high pass filters over the CCD
- If your camera has 'self cleaning' or 'in camera stabilisation' then read up what people way about cleaning your sensor (you might need to be very delicate with the swabs)
- If you are not fully confident in what you are doing then pay to have the sensor cleaned.
- You clean your sensor at your own risk, I'm just offering info on what I do to clean my sensor, damage to your camera is your responsibility. I'd recommend Googling sensor cleaning for your own camera make before starting the process.
- If there is anything you are not quite sure about then drop me a message and I'll try to help.


Sensor spots
Terry McGeary (not verified) on Sat, 2010-04-10 11:06cheap air
Steve Gibson on Tue, 2010-04-13 14:42Sensor
Terry McGeary (not verified) on Thu, 2011-05-12 22:02Sensor dust
Anonymous (not verified) on Thu, 2013-07-18 18:56Lenses
Steve Gibson on Sun, 2013-07-21 23:12Guessing you had a bad experience with a prosumer camera?
There are internal focusing interchangeable lenses that don't suffer the sucking in air feature, and I agree with you it is an issue, I took my zoom in a 'salty mist' and I think it's been 'hazy' / lacking contrast in he sun/contrasty conditions ever since :(
I think its fair to say that if you never take a kit lens off, its all but impossible to get dust on the sensor unless that kit lens has a telescoping rear element
true that my 50mm prime has moving rear element on focusing, so even just focusing in an out could ingest some dust.